Single booking are created using the schedule job screen. The scheduled job screen is the core interface/ model that is used to create all jobs and allocate jobs to resources.
Single client bookings are made using the Schedule Job modal. A single client job can be started from different views in Skedulo, including:
- Contacts tab, open the client’s contact record, and click Schedule Job.
- Client Availability Console (All Clients and Individual Client views), click on a date, then click the (+) plus sign and Add Job.
- Resource Roster Console (and Individual Resource view), click on date for resource worker, then (+) plus sign and then Add Single Client Job.
- Resource Calendar (and Individual Resource view), click on date for resource worker, then (+) plus sign and then Add Single Client Job.
- Roster Management, click on date for resource, (+) plus sign and Create Job.
- Scheduling Console (and Individual Resource view), click on date for resource worker, then (+) plus sign and then Add Single Client Job.
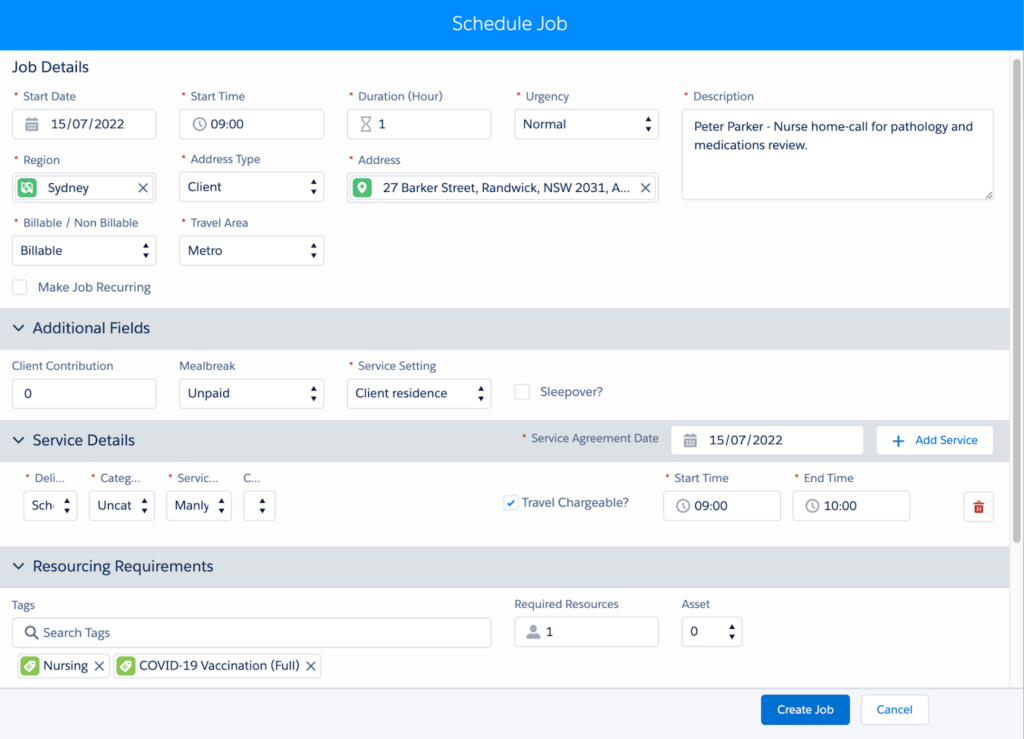
Components of the schedule job screen
The schedule job screen is made of the following components;
The job details
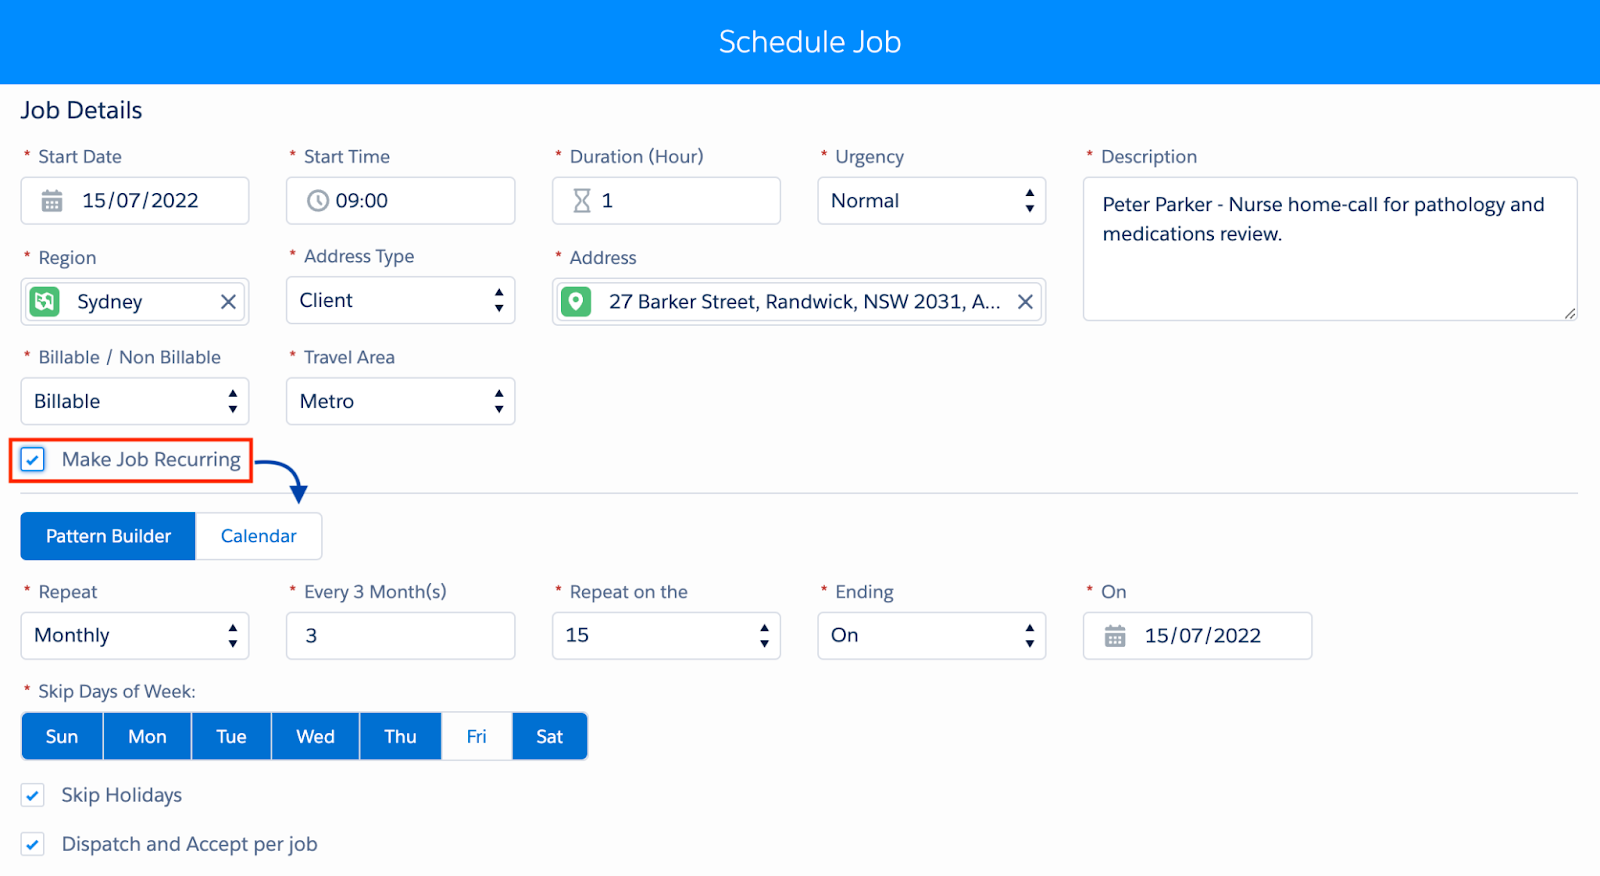
Key section that captures key information about the job. In this section you can also turn the job into a recurring schedule.
Additional fields
The Additional Fields section is for custom fields set up to collect additional information as per your organisation’s needs.

Service details
Used to attach one or more services to the job, which defines the billing logic and will charge the client when the job is completed.

Resource requirements
Reflects requirements for the job for number of resources and the tags they need to be suggested for the work.

Fig: Schedule job, resourcing requirements
Create Job Button
When you are happy with all the details on the schedule job screen, click the ‘create job’ button to enter the work into the system. The following model will show giving you some options for next steps, for example, if you want to allocate the job right away, click the ‘Allocate Resources’ button

Schedule job options
- Create offers – Allows you to offer the work to multiple resources.
- Go to job details page – Will either route you to the job record in Salesforce or the Web App (controlled by settings).
- Allocate resources – will open a model where you can allocate resources to the job.
Adding Job Tasks: If you need to add tasks to jobs, you can do this manually by viewing the job in the Skedulo Web App after creating it, or you can add job tasks to a job template in the Skedulo web app. Job tasks can be set as mandatory or optional in order for the resource to complete the job. This is controlled via a Global setting in the Web App.
Exception System Checks
A number of system checks can be performed as part of the job creation or job update process. These checks identify exceptions that may need to be resolved before a job record can be created. System checks occur when you click Create Job for a new job, or Update Job when making changes or allocating resources. Standard checks include:
Review and action the following checks that display during job creation.
- Time of Day Check – A Time of Day message displays when scheduling/updating a job in case the selected time does not correspond with the service selected.
- Balance Check – A Contract Warning message displays if a job is scheduled outside the service agreement time period, or the service agreement funding is not sufficient to cover the job.
- Cancellation Check – An exclamation triangle icon displays on Service Details if the client has exceeded their allowable cancellation limit.
- Job Conflicts / Availability Check – A message displays if the job time period clashes with another job, activity, shift, or an unavailability record or if the resource does not have any availability defined for that time.
Allocating Resources
Allocate resources to the job. From the Schedule Job confirmation message,
- Allocate Resources will open the allocation modal within Salesforce.
- Go to Job Details Page will open the Job in the Skedulo Web App.
- Create Offers will open an interface where offers can be sent (Offer can also be sent within the Allocate Resources modal).
Bonus: Custom settings that can effect the job creation process
The following configurations are controlled by admin custom settings that have been detailed.
- For each Lumary ‘Site’ created, a corresponding Skedulo ‘Location’ is created. If the Lumary site is updated, the changes will apply to the Skedulo location record.
- Lumary client On Hold Details can be set to show on the contact record.
- Ability to indicate if a job is billable or non-billable. This determines if a service delivered record is created or not.
- Additional custom fields can be displayed on a job. These fields can be made mandatory and also have a default value.
- Ability to set the default address type (client, location, or account).
- Option to assign resources within the job creation process, using the allocate resource option
- When allocating a job in Salesforce, the ability to define unique start and end times for each resource allocated.
- When saving a job the following checks can be enabled:
- Time of Day check
- Balance check, to identify if the job is within the service agreement time period and funding limits.
- Cancellation check, to confirm maximum cancellations on a service booking against the maximum allowable cancellations on a client plan.
- Client availability / existing job conflicts can be checked for the client.
- Job duration time periods (e.g. 15 min, 20 min, 30 min).
- The default job duration can be set using the following priority order:
- Where the default duration for a job type has been configured in the Job Template settings in the Skedulo Web App Administration settings then use that value as the default value when creating a new job.
Use the value set in the Salesforce custom setting, Sked Config > Global_Default_Job_Duration as default value when creating a new job.