Filtering

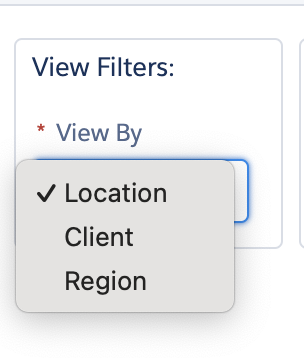
The Scheduling Console allows you to switch between three primary views. The View By filter enables viewing the resources and jobs by Location or Client or Region.
When a view by filter has been defined, the first filter option in the ‘Resource Filters’ section will change based on the view filter.
- Region view enables Schedulers to see staff (resources) for a Region, and work allocated to a Resource.
- Region view will change the first filter option to choose from a list of region records
- Location view enables Schedulers to see staff (resources) for a location, and work allocated to a Resource.
- Location view will change the first filter option to choose from a list of location records
- Users can view the Resources that have a Location Association or are allocated to the Jobs scheduled for the selected Location.
- Client view enables Schedulers to see staff (resources) for a Client, and work allocated to a Resource.
- Client view will change the first filter option to choose from a list of client records

Key Actions
The Scheduling Console offers a number of key actions represented by blue buttons at the top of the console.

Base Template – enable a scheduler to create a new or to select an existing Base Template (see administration details below on how to create a new Base Template).
Replicate Schedule – replicate a template period to a future period at the selected location or region (see Administration below for more details on how to replicate a Base Template).
Publish Schedule – will dispatch the jobs to the resources for the selected period and send a single notification to resources of the published schedule. Note that resources must have an associated user record, a resource type of ‘Person’ and must be active in order for the jobs to be successfully dispatched.
Print Schedule – to print a schedule for a location.
Filtering by resources and tags
- Use the Resource filter to only show resources in the scheduling console by specific resource names
- Use the Tags filter to show resources in the list with the associated tags (e.g. First Aid).
Display data section

Group By groups the listed resources by:
- Employment Type – group resources by Employment Type (eg casual, full-time and part-time).
- Category – group resources by Worker discipline type as defined by the Category on the Resource record (e.g. Occupational therapist, Nurse, Support Worker).
- Area – group jobs by area. Areas are specified against job and can be grouped together by are via the group by option.
Note: The ability to specify areas against jobs and to be grouped-by in the Scheduling Console is controlled by custom settings. Area records must be created before they can be selected against jobs.
Work Type filters change the calendar items displayed for resources as follows:
- Job – display the jobs in the calendar for the resource, with unallocated jobs listed at the top.
- Shift – display shifts allocated to the resources (Keypay and Easy Employer customers have shifts created from underlying records and these are sent to Keypay and Easyemployer )
- Timesheet Item – send to award interpreters for timesheets (Sage PeoplePay). Merges the same underlying records into the timesheet item (e.g consecutive jobs )
Ghost to display or hide ghost records (jobs, shifts, activities). Refer to Ghost Jobs for more definitions of ghost job.
Approved will show only the Approved Availabilities (Leave) noting that when Availabilities are created directly in the Scheduling Console, they will automatically be approved.
Job Status filter:
- Defaults to all job statuses, except for Cancelled (however the cancelled status can be manually selected if required)
- The filter is only available when Work Type filter selects Job
Calendar Display Controls
The control located in the top right of the console includes:
Select Calendar to display: Day, Week, 2 Weeks, or Month.
- Start Date – Displays the first day of the calendar view. You can select a different start date to display when the view is set to Calendar.
- Left Arrow (<) – Moves the calendar display back by time period.
- Right Arrow (>) – Moves the calendar forward by time period.
- Today – Returns the calendar or pay period to the current date with the current date highlighted.
Pay Period View
When users switch to the Pay Period view, the data shown in the console with the period contains the selected date. The calculation will be made based on custom settings defined by an administrator.
Note: Custom settings control which view is selected by default.
Saving Filters
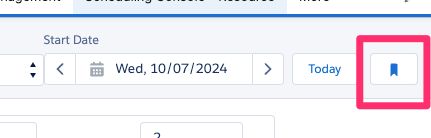
A single filter can be saved for the logged in User by clicking the Save Filter icon. The next time the user loads the Console, the parameters saved in this filter will be defaulted to.
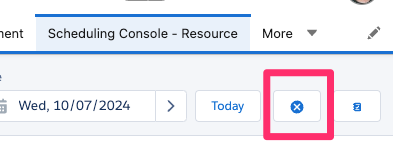
A Saved Filter can also be cleared by clicking on the Delete Icon