This article guides how to use the Roster Management Console header section.
The console header contains filters, function buttons, and calendar display controls. You can use the filters to search for and manage what data is displayed in the calendar.
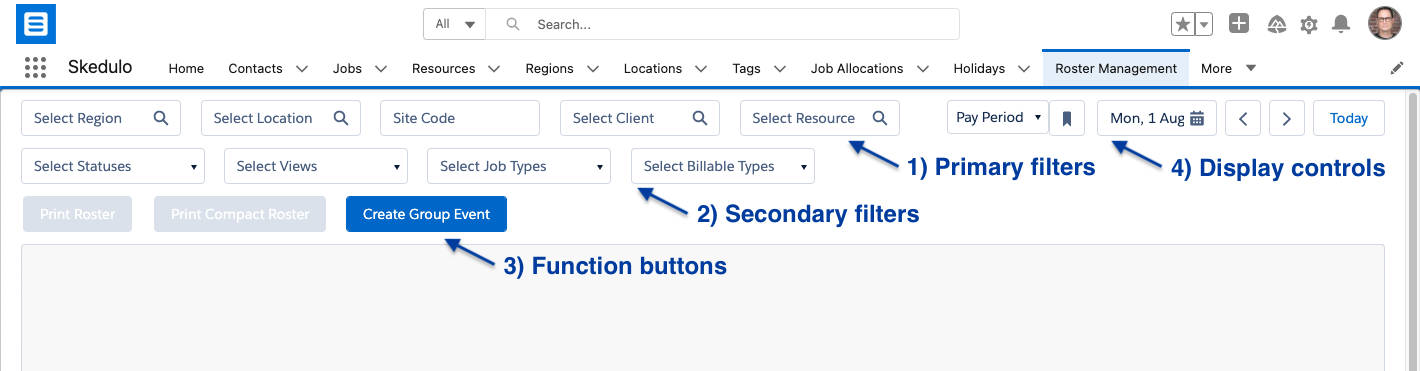
Fig: Roster management console, before filter selection
The roster filters and calendar grid are blank when you first open the console. As you select records using the primary roster filters, data will be displayed in the calendar.
Descriptions of these console elements follow:
- Primary roster filters define record items to display in the calendar. You can select one filter, or a combination. These filters include:
- Region – Work regions, as configured for your organisation.
- Location – Pre-define work settings (e.g. Supported Independent Living (SIL), or community based locations)
- Site Code – Used to identify a site or facility (e.g. cost centre).
- Client – A picklist that displays matching clients as you type their name.
- Resource – A picklist that displays worker resources.

Fig: Roster management console, primary roster filters
To use a filter, start typing a search name/term into the field. The list will display and populate with matching records, from which to select.
- Secondary filters help refine which records to display in the calendar, as follows:
- Statuses – A job’s progress status point. You can select one or many statuses from the list to show the matching job cards for:
- Queued
- Pending Allocation
- Pending Dispatch
- Dispatched
- Ready
- En Route
- On Site
- In Progress
- Complete
- Cancelled
- Views – Defines the calendar view:
- Job – Displays job cards for single client bookings and group events.
- Shift – Displays shifts.
Note: When filtered by resource, both Job and Shift can be selected. Activities also displayed for a resource when viewing jobs or shifts.
Only jobs will be displayed when filtered by region.
- Job Types – Filters the jobs displayed by single client bookings, and/or group events, or other types if configured for your organisation.
- Single Booking – Displays single client jobs.
- Group Event – Displays group events.
- Billable Types – Filter the jobs displayed by billing status.
- Billable
- Non-Billable
These filters further refine the calendar items to display.

Fig: Roster management console, secondary filters
- Function buttons display according to actions you can apply to the calendar view.
- Create Group Event – Opens the New Group Event modal, for creating a job or recurring jobs that involve multiple clients.
- Print Roster – Opens the Roster Description modal, to add description and option to include activities. Click Print to preview the roster. From the preview window, you can then print or download the roster as a PDF.
The roster lists job details, resources, and attendees for the pay or calendar period.
- Print Compact Roster – Provides a summary of job start and end times, by resource for a location.
- Replicate Roster – Opens the Job Replication modal, to copy a roster for jobs or shifts from one time period to another.

Fig: Roster management console, function buttons
- Calendar display controls, located in the top right of the console, include:
- Pay Period / Calendar – Defaults to Pay Period, as configured for your organisation. Select Calendar to display: Day, Week, 2 Weeks, or Month.
- Start Date – Displays the first day of the calendar view. You can select a different start date to display when the view is set to Calendar.
- Left Arrow (<) – Moves the calendar display back by time period.
- Right Arrow (>) – Moves the calendar forward by time period.
- Today – Returns the calendar to the current date or pay period with the current date highlighted.
- Bookmark icon – Saves the filter selections, to display when the Roster Management console is reopened.
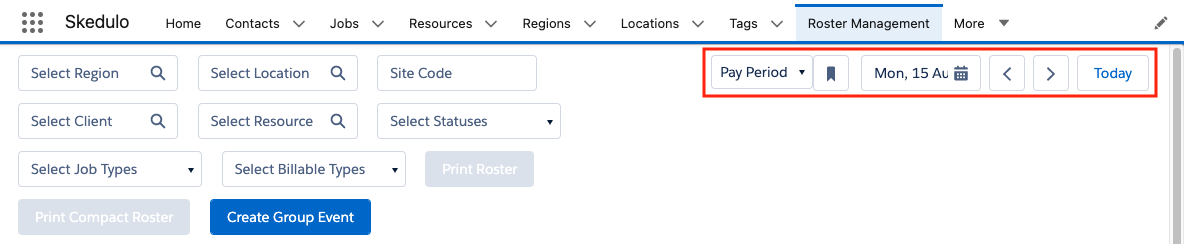
Fig: Roster management console, calendar display controls
Refer to Roster Management Functions for more information on these features, and tasks you can perform from the calendar.